One of the most common misconceptions about teaching multilingual learners is that scaffolding is something extra—something we add if we have time.
But here’s the truth:
Providing scaffolds is the instruction.
Our goal as educators of multilingual learners is not simply to cover content—it’s to make content accessible. That means ensuring students receive comprehensible input, or language they can understand, process, and use. Without scaffolds, content may be rigorous, but it’s not reachable.
And if students can’t access the language, learning can’t happen.
Scaffolds Are Required for Comprehensible Input
Scaffolds are not optional supports. They are intentional instructional moves that allow students to:
- understand what is being asked
- engage with grade-level ideas
- participate meaningfully in learning tasks
- build language alongside content
When we view scaffolding as “extra work,” we unintentionally frame access as optional. In reality, scaffolding is how we honor students’ current language development while holding high expectations.
High-Impact Scaffolds That Don’t Take Extra Time
One of the best-kept secrets? Some of the most effective scaffolds take very little extra time; they’re about how we teach, not how much we do.
Below are five instructional moves that help make language visible and content accessible—without adding extra work.
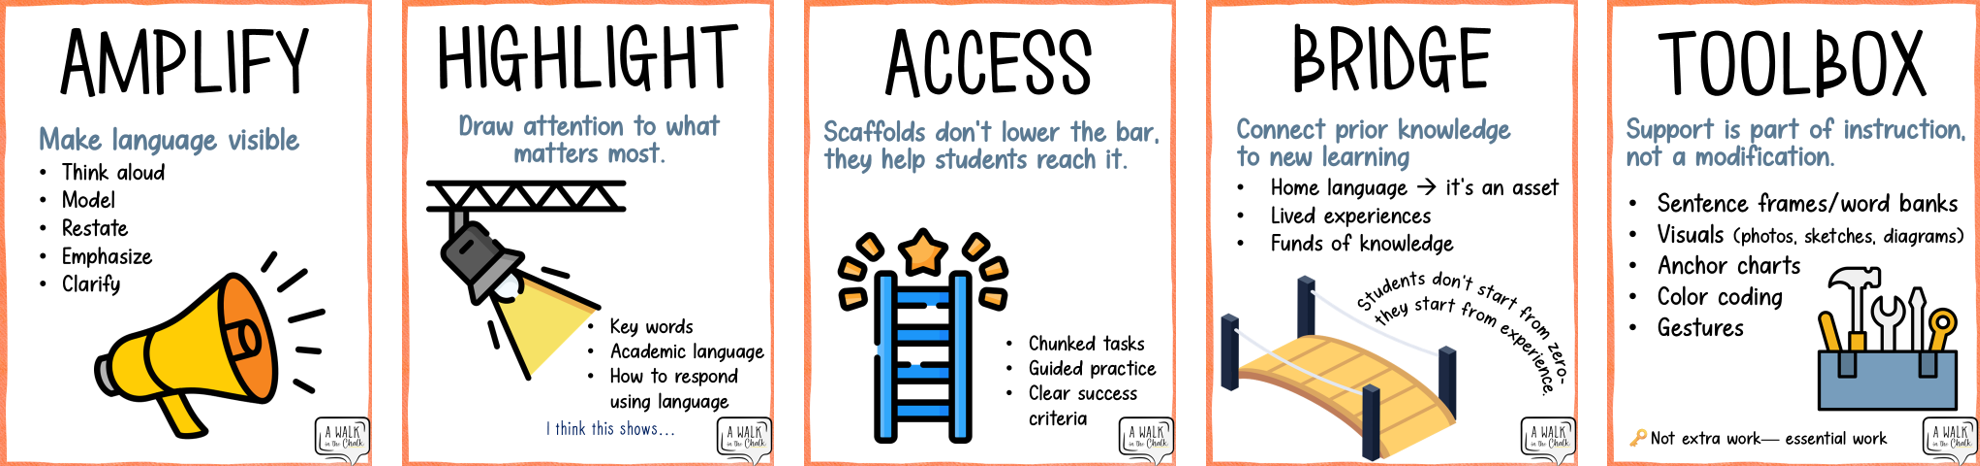
🔊 AMPLIFY: Make Language Visible
Amplifying language means making expectations explicit instead of assumed.
Restate & Emphasize
Restating provides additional opportunities for students to hear essential information. “This is important, let me say that again.” A simple way to emphasize key language is to have students “say it” or “read it with me,” whether it’s a vocabulary word, phrase or sentence from the text.
Classroom example: Students are learning about character traits, and a key vocabulary word is resilient. During instruction, I say the word, explain it, give examples, then ask students to read it with me. I then ask, “Do you know someone who is resilient?” and provide a sentence frame. ________ is resilient because ________.
Modeling & Think-Alouds
Saying out loud how you arrive at an answer or structure a response makes invisible language processes visible.
➡️ No extra materials—just intentional language.
Classroom example: Instead of asking students to “explain,” a teacher models a response aloud using a sentence frame and highlights the academic language being used.
Clarifying the Task
Restating directions, chunking steps, or highlighting key words ensures students know what to do before they struggle.
➡️ This saves time later by preventing confusion.
Classroom example: A teacher highlights key words in a question and shows students where to look in the text before asking them to respond.
🔦 HIGHLIGHT: Draw Attention to What Matters
Highlighting what matters most helps students focus their attention and reduces cognitive overload.
- key words in a question
- academic language in a task
- features of a strong response
Classroom example: Before students answer a written response, the teacher highlights the academic verb in the question and models what kind of language a strong response should include.
Intentionality with drawing attention to what matters most requires zero extra planning or preparation, it’s simply being mindful of what matters most for our students and “shining a light” on it for them to see.
🪜 ACCESS: Help Students Reach the Learning Goal
Access means students know what success looks like before they begin. Clear success criteria, chunked tasks, and guided practice help students engage with grade-level work without lowering expectations.
Classroom example: Instead of “Describe the habitat,” the teacher explains, “Your description should include (1) where it is, (2) what it looks like, and (3) one key feature.”
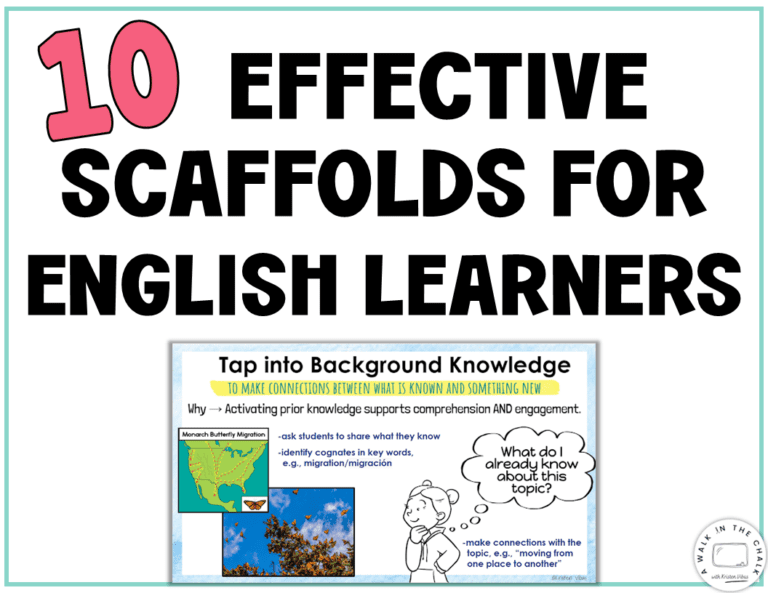
🌉 BRIDGE: Connect Prior Knowledge to New Learning
Bridging connects new content to what students already know through home language, lived experiences, and background knowledge.
Classroom example: Before a science lesson, students discuss with a partner or in small groups what they already know about storms before sharing ideas whole group.
A favorite strategy for tapping into background knowledge is a GLAD strategy called Observation Charts. Here’s a post that walks you through how this highly effective activity works in the classroom. 👀
🧰 TOOLBOX: Support Is Part of Instruction
These supports don’t modify learning—they make learning possible.
Visual Supports
Icons, images, diagrams, gestures, quick sketches or color coding make abstract language concrete and reduce cognitive load.
➡️ You’re likely already using visuals—being intentional makes them a scaffold.
Word Banks & Anchor Charts
Keeping key vocabulary visible supports students throughout a lesson/unit, not just during direct instruction.
➡️ Reusable and powerful.
Sentence Frames
Providing a sentence starter such as “I notice that…” or “This is important because…” gives students immediate access to academic language without simplifying thinking.
➡️ Low prep. High impact.
Scaffolding for Multilingual Learners in Action
Pictorial Input Chart
One of the most powerful ways to see scaffolding in action is through a Pictorial Input Chart. This strategy combines visuals, academic language, gesturing, and structured output to support both comprehension and language development.
During a pictorial input, the teacher draws and labels a visual while narrating the content aloud. Key vocabulary is introduced explicitly, information is chunked, and language is repeated across multiple modalities. Students are not just watching—they are processing meaning, hearing academic language, and making connections in real time.
Pictorial input charts naturally incorporate many of the scaffolds discussed above: visual supports, color coding, modeling, chunked information, and sentence frames. Rather than adding extra steps, this strategy weaves scaffolding directly into instruction.
Here’s a classroom demonstration of a pictorial input chart in action, making content and language accessible for all students.
Below is an example of a Water Cycle pictorial input chart. First, project the image and lightly trace it in pencil first. Then, in front of students, sketch the visuals while providing explicit, color-coded, comprehensible input.
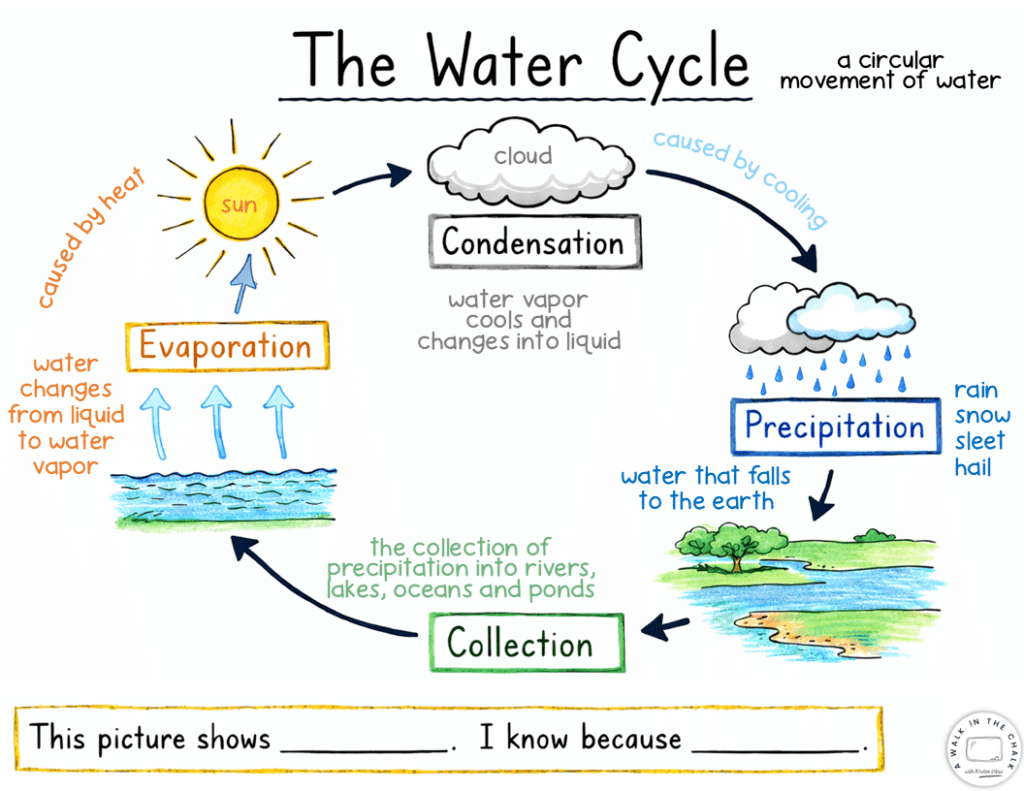
This illustrated pictorial input chart models how teachers can draw and narrate content during instruction.
This strategy’s scaffolds:
- Amplify – teacher narration, modeling academic language
- Highlight – color coding, arrows, key terms
- Access – chunked information & clear definitions
- Bridge – real-world water experiences (“Where have you seen a collection of water?”)
- Toolbox – visuals, repetition, sentence frame
👉🏼Join the newsletter and grab your own copy of this water cycle pictorial input chart!
A Shift in Mindset

Scaffolding is not about lowering expectations.
It’s not about doing the work for students.
And it’s not about adding more to an already full plate.
Scaffolding is about making language visible. It’s how learning becomes possible.
When we plan with scaffolds in mind, we’re not adding extra work—we’re doing the work that matters most. Because access isn’t optional. And language doesn’t grow without support.
Happy teaching,